
Important warning before you start using the program
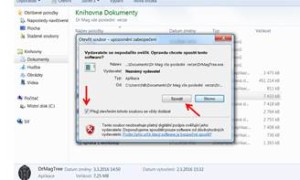
The program must be installed on your computer hard drive ( C ), in a document or external memory drive (flash drive, external drive, etc.). The program cannot be installed directly to the desktop; the desktop should contain the “shortcut” to the installed application. When you first start of the program a window appears and it says “Publisher could not be verified” which is a notification of non-verified user. This information appears always in the case of programs run on computers using the operating system of the “Microsoft” company if the program is not developed directly by this company or in case the publisher/developer did not buy a special licence key from the “Microsoft” company. Costs of this licence key are extensive and they would significantly increase the price of the program. The use of the program does not endanger your computer. Follow the red arrows to remove the notice “Always ask before opening this type of file” and subsequently click the “Run” button.

- Basic function settings
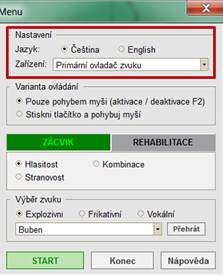
When you start the program the “MENU” panel opens. In the uppermost field, there are language settings (Czech, English) and the device for sound control. For normal use leave the default selection “Primary Audio Device”.
- Controls variant
In the following field, there are settings for program control mode. The easiest mode is represented by the default setting “Use Mouse Only”, where the tree image is controlled only by moving the mouse without the need to press any mouse buttons (suitable for small children and fine motor skills impairments). Another variant is “Push a Button and Move the Mouse”.
- Use mode choice
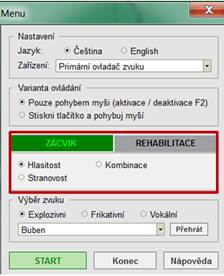
The program has two basic options of use: “Training” and “Rehabilitation” (see table at the top). Another option is to work with the change of intensity – volume of the chosen sound, or directionality (“Volume”, “Directionality”). The choice “Combination” allows you to work with volume and directionality at the same time. While working with volume and directionality the sound is always compared with the previous one, the reference point is the previous sound event.
Pole s označením „Výběr zvuku“ nabízí tři základní akustické charakteristiky „Explozivní“, „Frikativní“ a „Vokální“. Po zvolení základního charakteru zvuku zvolte ve výběrovém okénku konkrétní zvuk z připraveného výběru pro konkrétní zvukovou charakteristiku (buben, šustění papíru atd…). Kliknutím na tlačítko „Přehrát“ lze zvuk spustit a případně doladit zesílení reproduktorů na komfortní hlasitost.
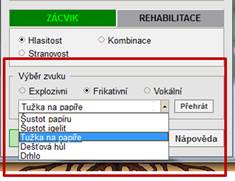
The field labelled “Sound Selection” offers three basic acoustic characteristics “Explosive”, “Fricative” and “Vocal”. Choose the basic nature of sound and then select in the selection window one of the specific sounds from the collection of sounds for the specific sound characteristics (drum, paper rustling, etc.). Click the “Play” button to play the sound and adjust the speaker volume to comfortable level.

The program function is started by clicking the “Start” button and the program closes when you click the “End” button.

CONTROL KEYS:
F4 –opens the menu
F2 –enables the mouse function
F1 –sound frequency controls (use only in special cases, changes the whole sound sequence frequency, not defined by tone)
R – tree image reset (active only in the rehabilitation mode of the program)
Important warning before you start using the program
The program must be installed on your computer hard drive ( C ), in a document or external memory drive (flash drive, external drive, etc.). The program cannot be installed directly to the desktop; the desktop should contain the “shortcut” to the installed application. When you first start of the program a window appears and it says “Publisher could not be verified” which is a notification of non-verified user. This information appears always in the case of programs run on computers using the operating system of the “Microsoft” company if the program is not developed directly by this company or in case the publisher/developer did not buy a special licence key from the “Microsoft” company. Costs of this licence key are extensive and they would significantly increase the price of the program. The use of the program does not endanger your computer. Follow the red arrows to remove the notice “Always ask before opening this type of file” and subsequently click the “Run” button.
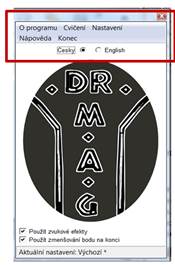
- When you start the program the logo with the basic menu pops up with the following options: “About the program”; “Exercises”; “Settings”; “Help”; “End” and the selection of a language.
- The default setting of the program is “Sound Effects Use” and “Point Shrinking at the End”. The setting is suitable for most cases at the beginning of training. If you click this setting, these functions are disabled.

- If you select the function “Settings”, the panel with the options “Load Settings”; “Graphical Elements” and “Setting Sequence” appears. The function “Load Settings” allows us to use any pre-defined graphic environments for the exercises we have chosen (they are stored using the function “Graphic Elements”). The function “Settings Sequence” allows us to define exercise sequences in advance (see paragraph 6).

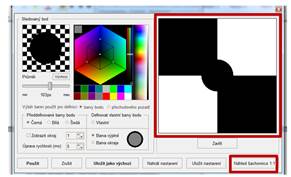
Select the function “Graphic Elements” and a panel will show where the graphic environment for the exercises you want to do is defined: Shade and colour of background, appearance of moving point and the speed of movement. On the right part there are tools to define the background; left part is designed for the moving point. In the upper left-hand corner your current selection of the graphic environment is displayed.


The following can be selected:
3a. Moving point shade and colour.
3b. Colour of the moving point fringe
3c. Movement speed and fringe width of the point
3d. Point size
3e. Background graphics
3a. Moving point shade and colour selection is done by ticking “Filter Colour”. There are three pre-defined colours: black, white and black. The selection is done by simply ticking the shade. In the figure you can see the black colour of the point without a fringe.
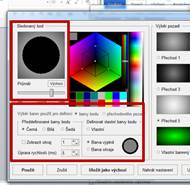
If you want to create your own colour, use the function “Define custom colour” and tick the “Custom” box. The colour is selected in the colour pallet (red colour for the moving point is selected in the figure).
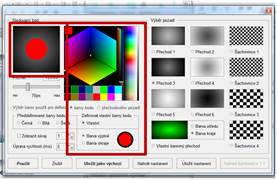
3b. Moving point fringe colour: Tick “Fringe Colour” – “Custom” – “Show Fringe”. In the colour pallet the desired colour is selected (coloured fringe intensifies the contrast of the moving point against the background in cases the background is of a similar shade as the moving point).

3c. Movement speed selection and point fringe width is done by selecting a number in the marked field. The higher the number, the slower the movement of the point is and vice versa. For common everyday use it is advisable to work with the “5” speed selection, which is set by default.

3d. Point size selection is performed on a scale under the real display of the graphic environment in the upper right-hand part of the panel.

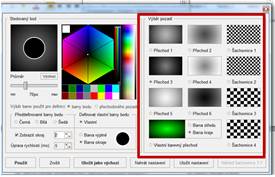
3e. Background graphics selection is done by ticking any of the pre-defined backgrounds in the displayed panel of “Graphic Elements” (figure 3 shows background no. 3).
If you want to select a custom background colour, first tick the selection “Custom Colour Transition” under the coloured rectangle. Then tick if you want to change the colour of the middle field or fringes of the field with the background. The colour is selected again on a colour scale after ticking “Use colour selection for … background definition”.

At the “Chessboard” background selection it is possible to generate a preview of the moving point to the chessboard square size ratio.
- Selections of use and storing of the selected graphic environment for the following exercises are at the bottom of the graphical environment selection field.
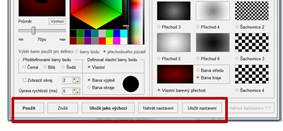
4a. The “Use” window allows us to use the selected background and the moving point in the following exercise. When you click this window the program switches to its basic setting and you can choose the exercise. The setting is not designed for repeated use.
4b. The “Use as default” window allows us to use the set graphic environment again. When you save it by clicking the “Use” window, the program automatically goes to the selection of the individual exercises.
4c. The “Save Settings” window allows us to save one by one and to name the graphic settings we have generated in the memory. In this way precisely defined graphic versions can be created in advance.

Any pre-set graphic settings may be activated by clicking the “Load Settings” field, which is in the graphic settings field as well as in the basic menu with the program logo. Subsequently it performs the selection of the pre-defined graphic environment.


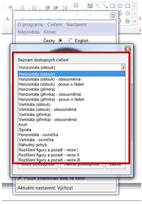
- Choose the actual exercise you want to do by clicking the “Exercise” window in the basic logo menu. The selection of the individual exercises appears. After you choose one of the exercise types, the program goes directly to the selected type in the pre-defined settings or chooses the graphic settings you have saved.

Exercises start automatically and you can end them by pressing the “Esc” key. When the exercise ends, the basic menu with the logo reappears.
- The program contains the option to define the exercises sequence in advance. It is beneficial especially for home exercises of the rehabilitated person, or in cases when the therapist works with a similar range of patients; the option to define exercise sequences makes the work easier much easier. Another advantage is that the rehabilitated person does not lose/interrupt the concentration by the necessity to define new exercises. To define the exercise sequences use the “Exercises Sequence” option. Any pre-selected exercises will automatically alternate in the selected order based on your choice and also when you start the program again.

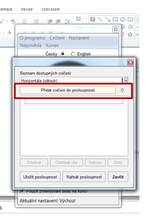
In the “List of available exercises” choose the exercises you want to do from the menu in the order in which they should be performed. When you make the list of exercises, confirm every choice in the “Add Exercise to the Sequence” window. If the exercises are defined, the order selection can be saved using the “Save Sequence” key. While saving it is necessary to name the set so that it can be reused.


If you want to look at the contents of the individual exercise series you have saved in the future, the “Load Sequence” key shows the list of your saved exercises and when you click its name the list of your saved exercises appears. Once chosen, the sequence and defined individual exercise list appear.

You can select your predefined exercise sequence for the exercise using the “Exercise” – “Use sequence” option. The window shows the list of your defined exercises. Clicking the selected title switches the program directly into the exercise mode. The length of individual exercises and the transition between activities is determined by moving the arrow key on the keyboard (step forward = right/down arrow, step backward = left/up arrow).

Basic recommendations for choosing program settings options properly
| 1. GRAPHIC SETTINGS: | Effect on the rehabilitation process: |
| Graphic settings in shades of grey | Decreases visual stress |
| Graphical settings in colours | Indicated for special cases with the colour perception disorder or accented problems with distinguishing figure from ground. |
| Fringe of the moving object | Intensifies the contrast of the dominant signal against the background without any increase in the visual stress. |
| Chessboard background | Accent on the training of the ability to capture visual signals. The moving point should always be smaller than the chessboard square. The moving point should be white or black. In the case of serious disorders it is advisable to use point fringe in the shade of grey. |
|
|
|
| 2. MOVING POINT DIRECTION | Effect on the rehabilitation process: |
| Left to right horizontal | Training of the ability to maintain visual signals in general, training of the central line transition and rehabilitation of reading disorders. It is advisable to start with an arc, only then follows the transition to higher difficulty – movement on line.
|
| Bidirectional horizontal | Suitable for special rehabilitations of vertigo conditions or for targeted work with the vertical central line transition. |
| Vertical and combined movements | Suitable for special rehabilitations of vertigo conditions or for targeted work with the horizontal central line transition. |
|
|
|
| 3.SHAPE OF THE POINT MOVEMENT | Suitable rehabilitation target group: |
| Horizontal arc – shift to the line below Number eight Circle Distinguishing figure from ground |
Developmental speech and learning disorders, DVO – partial performance deficit, concentration disorders, ADHD |
| Other exercise options (especially bidirectional movement and movement along a line). | Suitable for possible rehabilitations of vertigo conditions, or some cases of vision impairments. |
Basic equipment: Computer/laptop, 2 speakers which allow you intensify the stereo sound sufficiently.
Important warning before you start using the program
The program must be installed on your computer hard drive ( C ), in a document or external memory drive (flash drive, external drive, etc.). The program cannot be installed directly to the desktop; the desktop should contain the “shortcut” to the installed application. When you first start of the program a window appears and it says “Publisher could not be verified” which is a notification of non-verified user. This information appears always in the case of programs run on computers using the operating system of the “Microsoft” company if the program is not developed directly by this company or in case the publisher/developer did not buy a special licence key from the “Microsoft” company. Costs of this licence key are extensive and they would significantly increase the price of the program. The use of the program does not endanger your computer. Follow the red arrows to remove the notice “Always ask before opening this type of file” and subsequently click the “Run” button.
- .Starting the program brings up the control panel of the program, which has three basic components:
“Dominant signal sound control” – marked with the green frame in the picture. “Background sound control” – marked with the orange frame and “Usable sound database” – red frame.
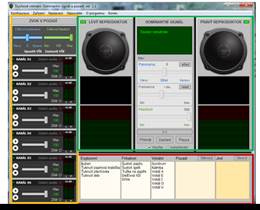
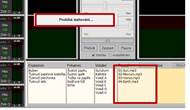
The sound database offers three sound groups to utilize for “dominant signal”: explosive, fricative and vocal. The “Background sounds” field is empty. Before the first use of the program it is necessary to install the database from the internet. This is done by clicking the “Download” button. The internet connection is required.

When you click the “Download” button a message indicating the download process appears and the empty field is filled with the individual sounds.
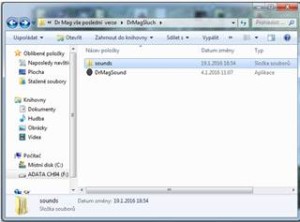
When the background sounds have been downloaded they should be stored in the same place as the program itself. The file is called “Sounds”. Sounds are recorded permanently and can be re-used.
- Program controls – “sound selection, background sound” is selected by using the mouse in the column “Background” and using the mouse they are dragged to any of the selected channels of the background sound device. Once they are dragged there the “Stereo” sign appears in set channel.

The same method is used to select the “dominant signal” sound and to use the mouse to drag it into the middle field in the dominant signal control.
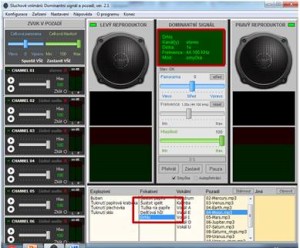
The dominant signal sounds are changed by transmitting a new selected sound, which replaces our previous selection. When the computer is turned off and rebooted again it is always necessary to perform a new sound selection, because the previous setting is not saved in the program memory.
2.1 The “Dominant signal” sound controls are in the middle window between speakers. The “Panorama” function controls which side/speaker comes the sound from. The “Volume” function controls the intensity of the sound and “Frequency” function changes the basic sound frequency. Playback is controlled by using “Play”, “Stop” and “Pause” buttons. Only one dominant signal at a time may be active.
2.2 The “Background sound” controls are located in the left column of the control panel. Every channel has its own volume controls, switching on/off and sound intensity increase. Several background sounds may be active at the same time.

If we want to control all active sounds intensity simultaneously, we can use the controls above the individual channel controls window. These controls can control simultaneously the directionality of listening using the “Panorama” function, i.e. which side/speaker produces the sound.

- When other/customized sounds are loaded it is necessary to open the “Sounds” file in the program directory; you can select here whether the sound is saved in the “Background” file or in the “Basic” dominant signal file. When the selected file is opened the sound is dragged from the customized directory into the program directory.
